
The RP141 Garage Door Threshold Seal is suitable for all types of garage doors.
Notes: Prior to installation, the concrete floor surface must be cleaned thoroughly to remove dust, oil and grease. If the floor is painted, wire brushing where the seal is to be installed will ensure best adhesion.
Prior to Step 8, roll out RP141 to lay flat preferably in sunlight until RP141 is level along full length. Apply suitable weights to hold RP141 flat along full length in Step 9.
Please refer to the door manufacturers door closer adjustment instructions before installing the RP141 threshold seal. Manual door close latching may require adjustment.
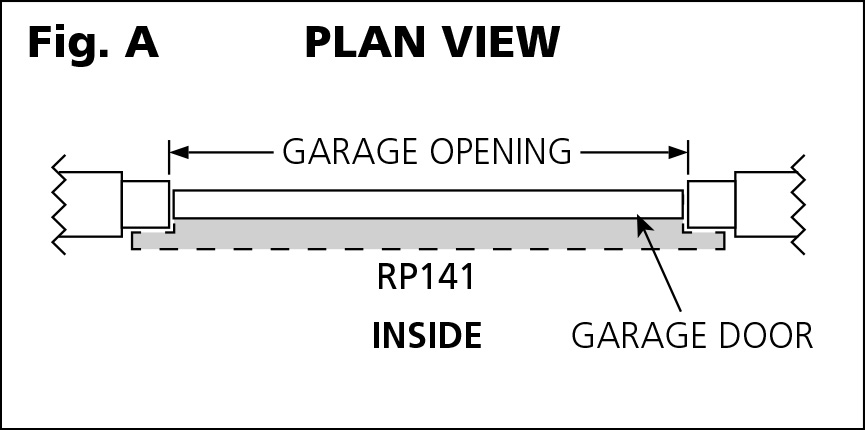
- Check garage door configuration (Fig.A or Fig.B).
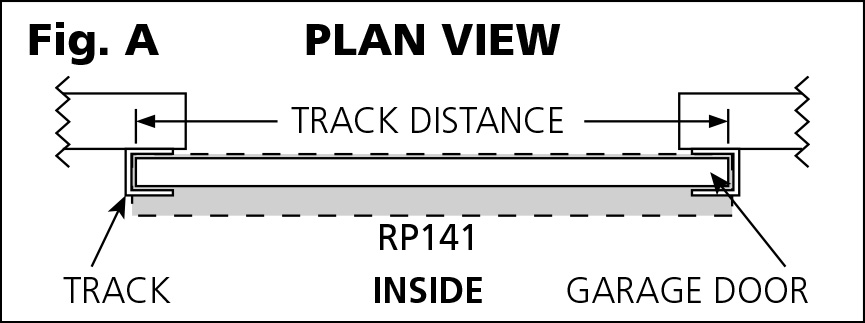
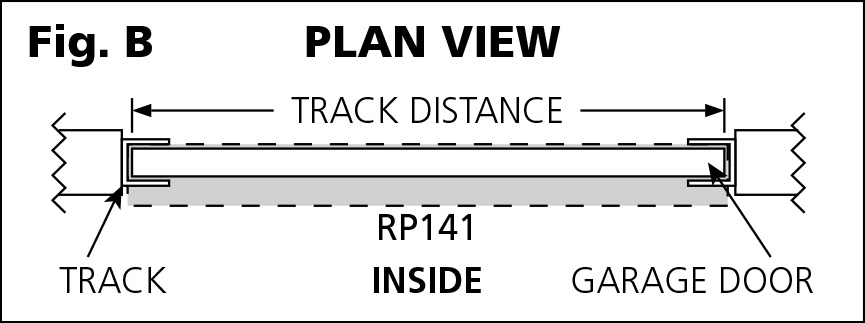
- Open garage door and measure the full distance between the inside of the garage door tracks (Fig.A or Fig.B).
- Cut RP141 to marked length with hacksaw.
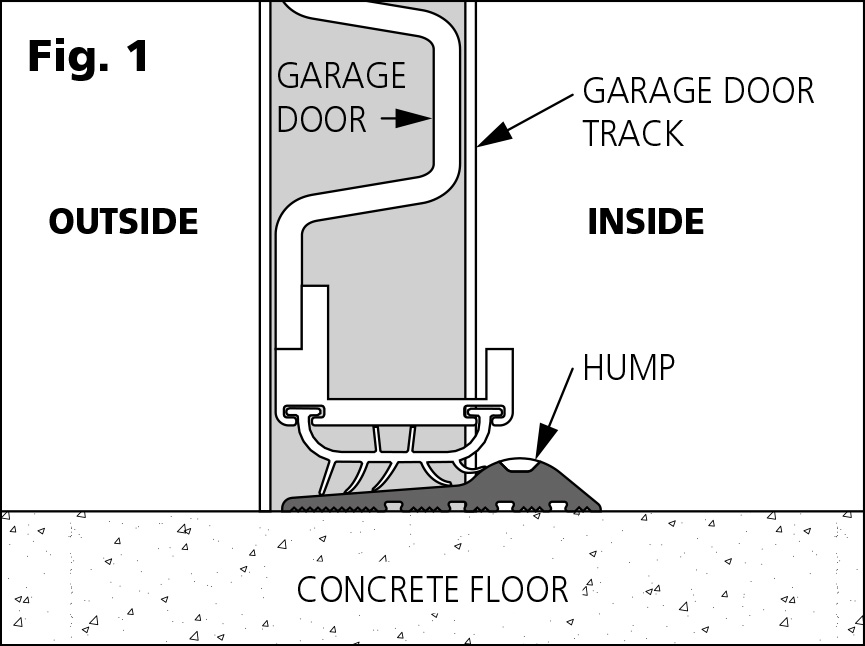
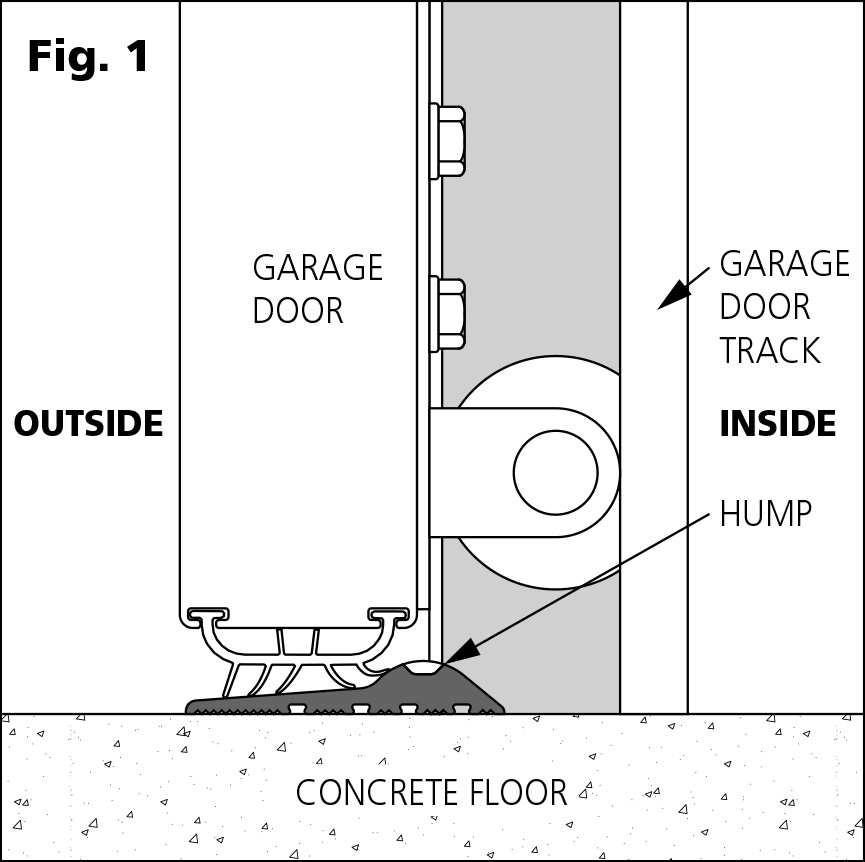
- Position RP141 so the hump is inside the garage door bottom when closed (Fig.1).
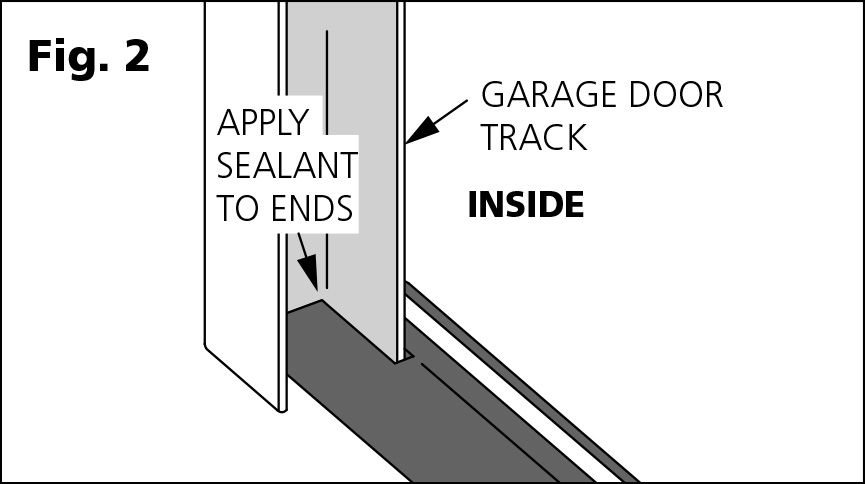
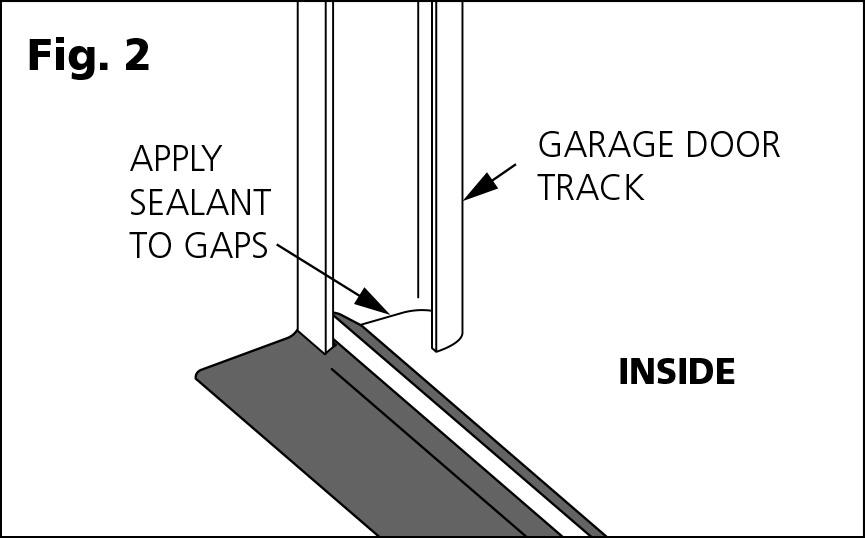
- Mark RP141 at each end where it needs to be slotted to seal neatly around garage door track (Fig.2). Cut RP141 as marked.
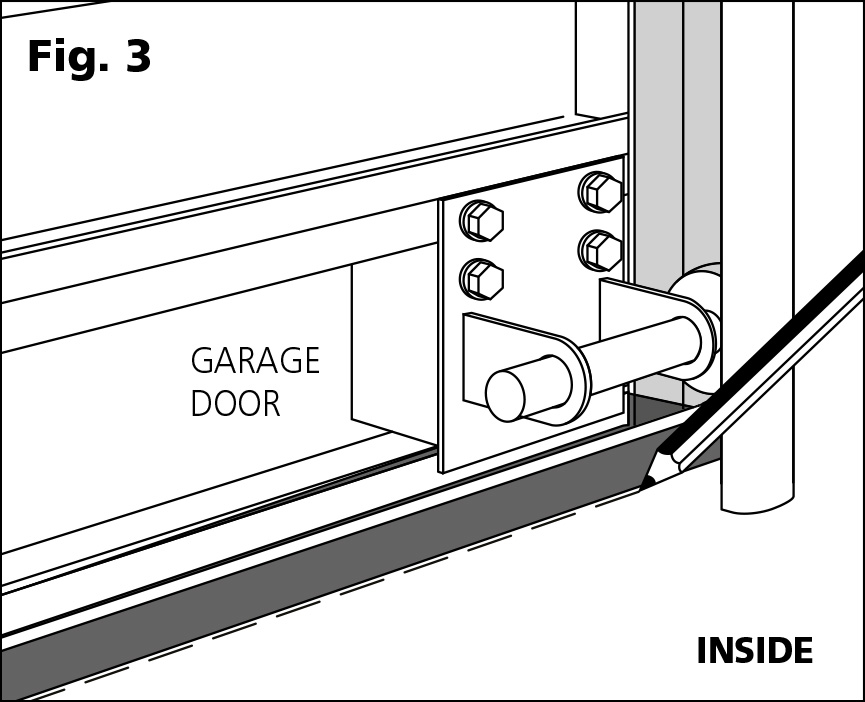
- Inside garage with door closed, position RP141 as shown (Fig.1). Mark a pencil line along the back edge of the seal on the concrete floor (Fig.3).

- Open the door and mark a pencil line along the outside front edge of the RP141 on the floor. Remove RP141 and pencil mark two parallel lines 10mm inside the existing marked lines. Then pencil mark a zigzag line (60mm spacing interval) in between the newly marked floor lines (Fig.4).

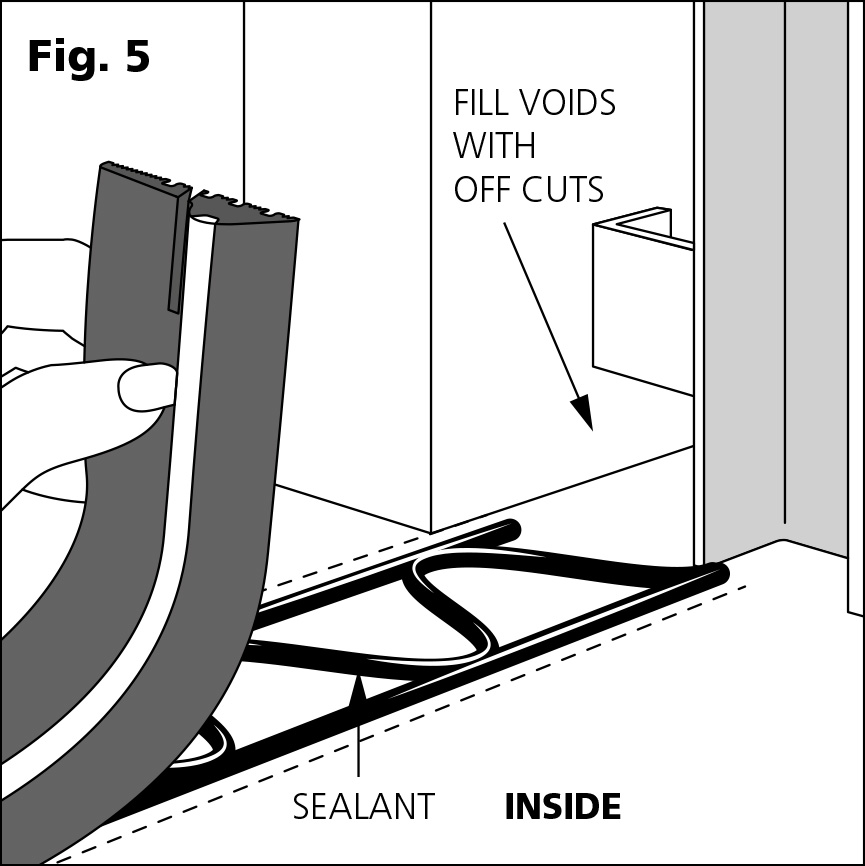
- Make sure RP141 sits flat. Refer Notes.Apply a 3mm - 5mm bead of supplied adhesive sealant to the concrete floor following the marked pencil lines but 10mm inside the outer marked lines as shown (Fig.4 & Fig.5).
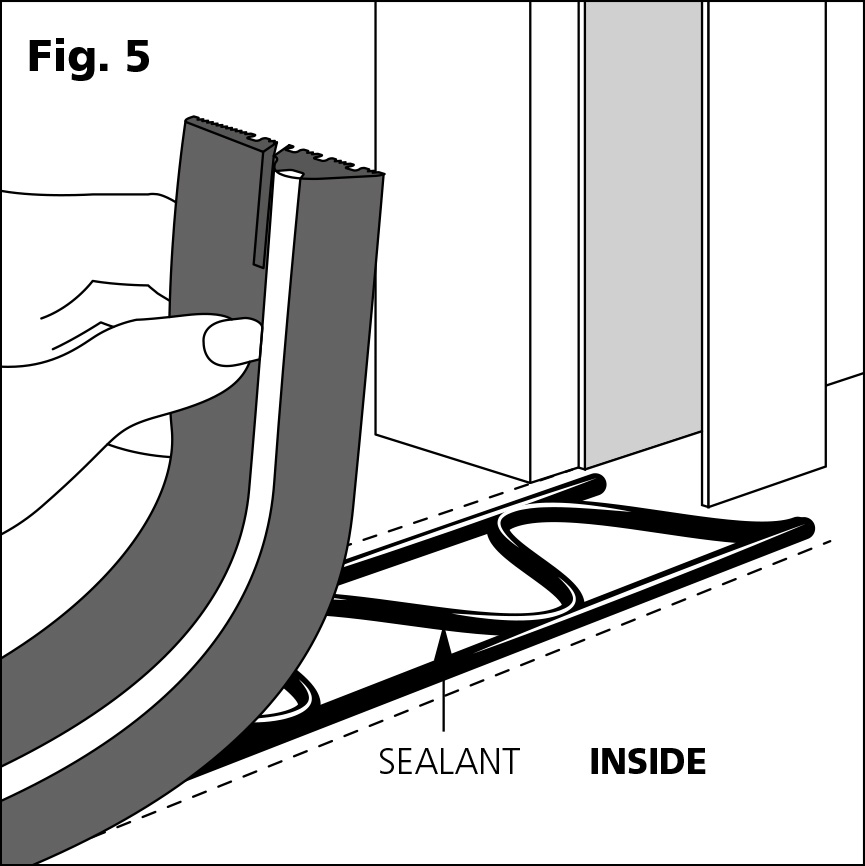
- Beginning at one end, using the outer marked lines as a guide, progressively place RP141 onto the adhesive sealant bed by pressing down firmly on the seal and working carefully to the other end. Ensure firm pressure is applied along the full length of the RP141 to ensure a good adhesive bond between seal and floor surface (Fig.5).
- Apply sealant to ends of RP141 and fill any voids (Fig.2).
- Before adhesive cures, remove excess with a cloth. Allow 24 hours before driving over the RP141.
Notes: Prior to installation, the concrete floor surface must be cleaned thoroughly to remove dust, oil and grease. If the floor is painted, wire brushing where the seal is to be installed will ensure best adhesion.
Prior to Step 7, roll out RP141 to lay flat preferably in sunlight until RP141 is level along full length. Apply suitable weights to hold RP141 flat along full length in Step 8.
Please refer to the door manufacturers door closer adjustment instructions before installing the RP141 threshold seal. Manual door close latching may require adjustment.
- Open garage door and measure the full distance between the inside of the garage door tracks (Fig.A).

- Cut RP141 to marked length with hacksaw.
- Position RP141 so the hump is inside the garage door bottom when closed (Fig.1).
- Mark RP141 at each end where it needs to be notched out to seal neatly around garage door track (Fig.2). Cut RP141 as marked.
- Inside garage with door closed, position RP141 as shown (Fig.1). Mark a pencil line along the back edge of the seal on the concrete floor (Fig.3).
- Open the door and mark a pencil line along the outside front edge of the RP141 on the floor. Remove RP141 and pencil mark two parallel lines 10mm inside the existing marked lines. Then pencil mark a zigzag line (60mm spacing interval) in between the newly marked floor lines (Fig.4).

- Make sure RP141 sits flat. Refer Notes.Apply a 3mm - 5mm bead of supplied adhesive sealant to the concrete floor following the marked pencil lines but 10mm inside the outer marked lines as shown (Fig.4 & Fig.5).
- Beginning at one end, using the outer marked lines as a guide, progressively place RP141 onto the adhesive sealant bed by pressing down firmly on the seal and working carefully to the other end. Ensure firm pressure is applied along the full length of the RP141 to ensure a good adhesive bond between seal and floor surface (Fig.5).
- To prevent leakage at ends of RP141, fill voids with off cuts and seal gaps with sealant (Fig.2 & Fig.5).
- Before adhesive cures, remove excess with a cloth. Allow 24 hours before driving over the RP141.
Notes: Prior to installation, the concrete floor surface must be cleaned thoroughly to remove dust, oil and grease. If the floor is painted, wire brushing where the seal is to be installed will ensure best adhesion.
Prior to Step 7, roll out RP141 to lay flat preferably in sunlight until RP141 is level along full length. Apply suitable weights to hold RP141 flat along full length in Step 8.
Please refer to the door manufacturers door closer adjustment instructions before installing the RP141 threshold seal. Manual door close latching may require adjustment.
- Open garage door and measure the full distance of the opening plus an extra 40mm each end (Fig.A).
- Cut RP141 to marked length with hacksaw.
- Position RP141 so the hump is inside the garage door bottom when closed (Fig.1).

- Mark RP141 at each end where it needs to be notched out to seal neatly around wall (Fig.2). Cut RP141 as marked.

- Inside garage with door closed, position RP141 as shown (Fig.1). Mark a pencil line along the back edge of the seal on the concrete floor (Fig.3).

- Open the door and mark a pencil line along the outside front edge of the RP141 on the floor. Remove RP141 and pencil mark two parallel lines 10mm inside the existing marked lines. Then pencil mark a zigzag line (60mm spacing interval) in between the newly marked floor lines (Fig.4).
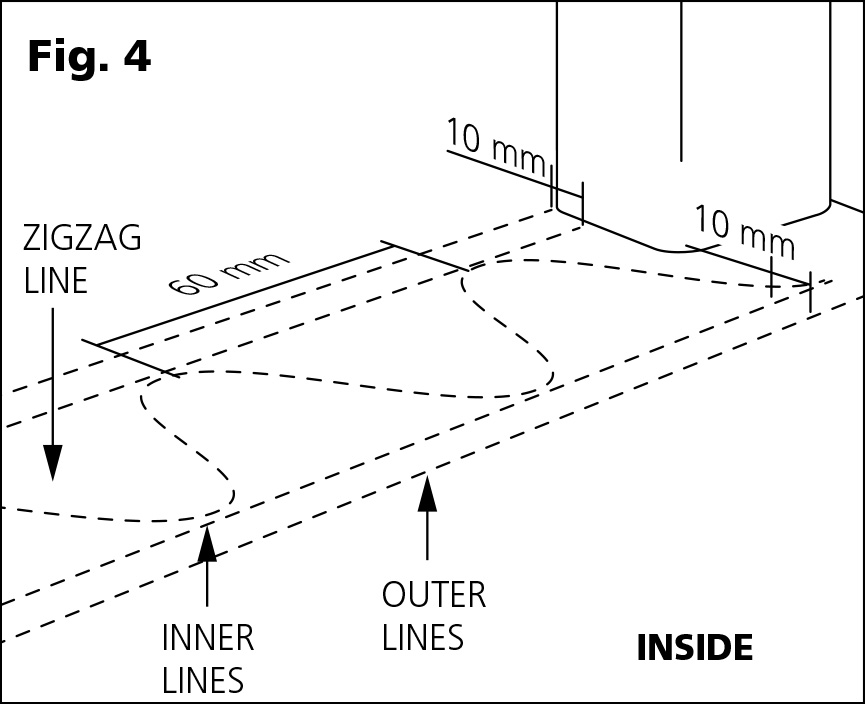
- Make sure RP141 sits flat. Refer Notes. Apply a 3mm - 5mm bead of supplied adhesive sealant to the concrete floor following the marked pencil lines but 10mm inside the outer marked lines as shown (Fig.4 & Fig.5).

- Beginning at one end, using the outer marked lines as a guide, progressively place RP141 onto the adhesive sealant bed by pressing down firmly on the seal and working carefully to the other end. Ensure firm pressure is applied along the full length of the RP141 to ensure a good adhesive bond between seal and floor surface (Fig.5).
- Apply sealant to ends of RP141 and fill any voids (Fig.2).
- Before adhesive cures, remove excess with a cloth. Allow 24 hours before driving over the RP141.